 Replacing a roof is one of the most significant investments a homeowner can make. It not only enhances your property’s aesthetic appeal but also plays a critical role in protecting your home from the elements. A well-executed roof replacement can increase the lifespan of your home, boost its resale value, and provide peace of mind for years to come. Here’s everything you need to know about roof replacement as a homeowner.
When Should You Consider a Roof Replacement?
- Age of the Roof: Most asphalt shingle roofs last about 20–30 years.
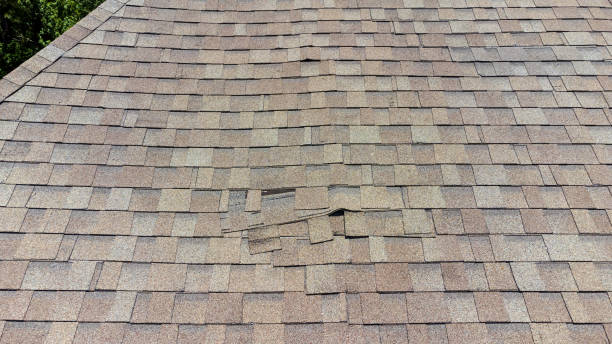
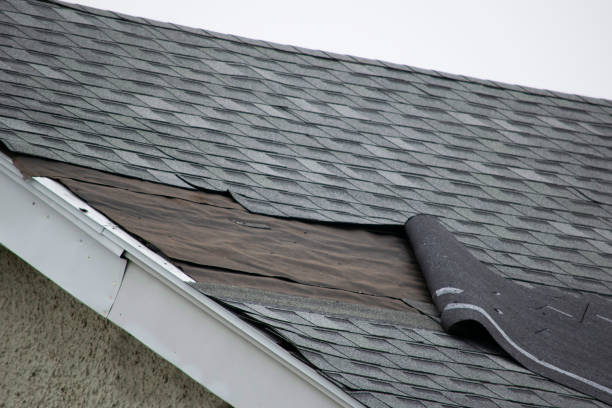
- Visible Damage: Missing, cracked, or curling shingles are strong indicators that your roof’s integrity has been compromised.
- Sagging Areas: A sagging roof deck could signal structural issues that necessitate immediate attention.
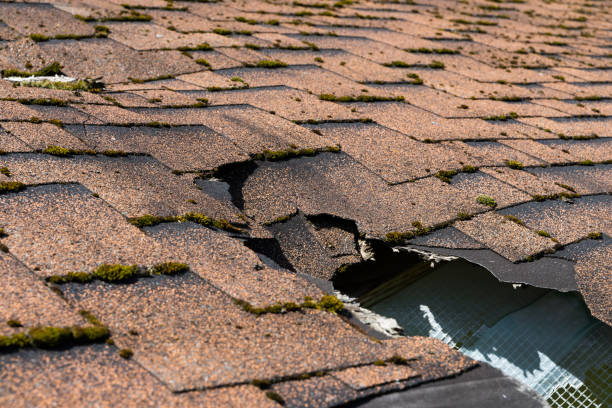
- Leaks and Water Damage: Persistent leaks or signs of moisture in the attic may suggest underlying problems requiring replacement.
- Energy Efficiency Concerns: An aging roof with poor insulation can lead to higher energy bills due to heat loss during winter or insufficient cooling during summer.
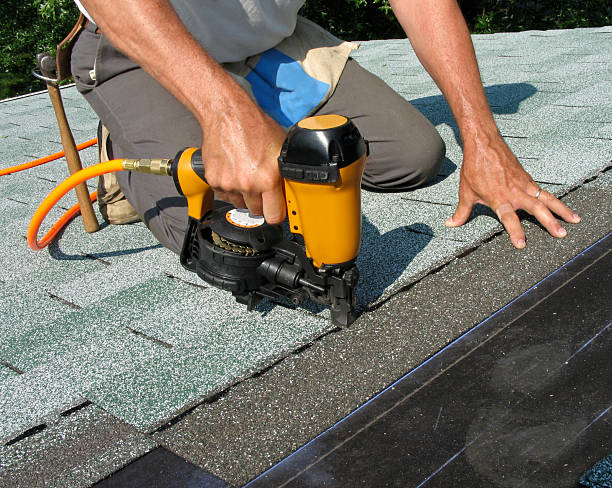
Steps Involved in Roof Replacement
Understanding how the process works can help homeowners feel more prepared and confident when undertaking a roofing project.
- Measurements are taken, and recommendations on materials and costs are provided.
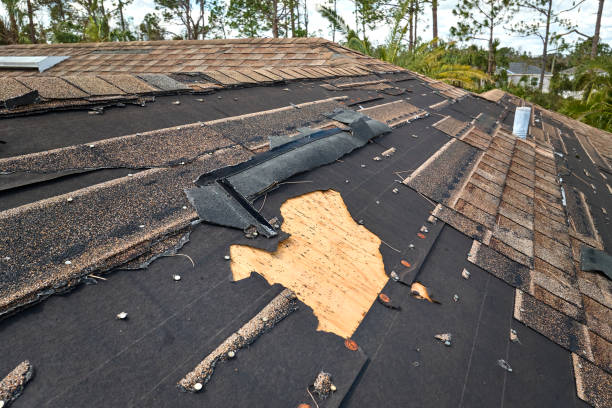
- All existing shingles and underlayment are carefully removed to expose the decking underneath.
- Any damaged sections of decking are repaired or replaced before laying down new materials.
- A waterproof underlayment is installed as an added layer of protection against moisture.
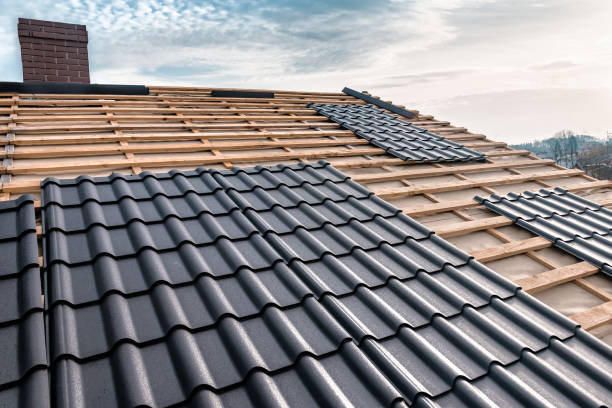
- Shingles, metal panels, tiles, or other selected materials are installed according to manufacturer guidelines.
- The contractor inspects their work for quality assurance before cleaning up debris from your property.
Benefits of Replacing Your Roof on Time
| Benefit | Description |
| Enhanced Home Value | A new roof improves curb appeal and attracts potential buyers if selling your home. |
| Improved Energy Efficiency | Modern roofing systems reduce energy consumption through better insulation properties. |
| Protection Against Leaks | Eliminates water infiltration risks that could damage walls, ceilings, or belongings inside the house. |
| Long-Term Cost Savings | Prevents recurring repair expenses that come with maintaining an old deteriorating roof. |
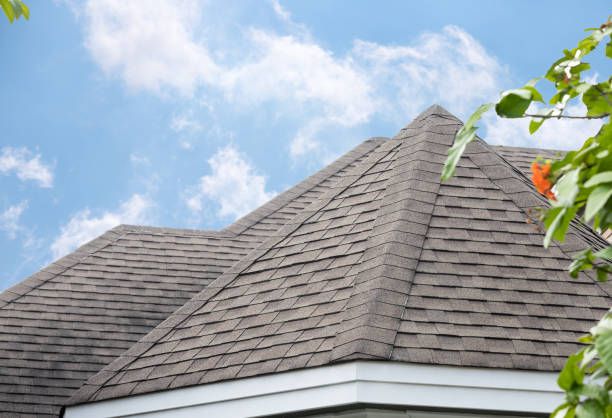
Choosing Roofing Materials That Match Your Needs
- Asphalt Shingles:Affordable, versatile, and widely available; ideal for most homes.
- Metal Roofing:Durable with high resistance against extreme weather but comes at a higher price point.
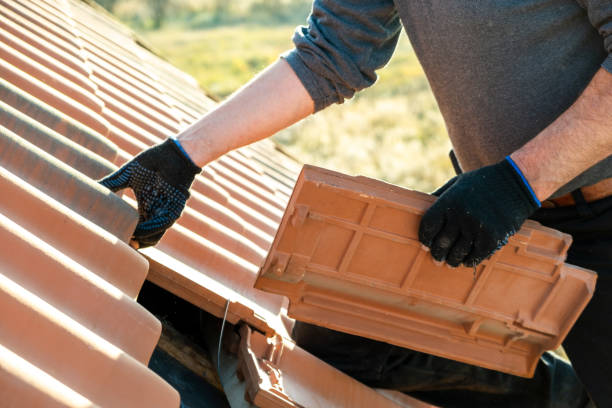
- Clay Tiles:Excellent choice for homes in hot climates due to heat resistance; offers longevity but requires professional installation due to weight.
- Slate Roofing:Premium option boasting unrivaled durability; suitable for homes designed with traditional aesthetics in mind.
Each material has its pros and cons regarding cost-effectiveness versus durability—consulting with an experienced roofer ensures you make an informed decision.
Tips To Maximize ROI on Your Roof Replacement Project
- Work exclusively with licensed contractors who have experience in similar projects.
- Request warranties on both materials used and labor provided by contractors.
- Opt for high-quality materials within budget instead of settling solely based on price considerations.
- Schedule routine maintenance post-installation (e. g. , annual inspections) to prolong its lifespan.
Planning proactively empowers homeowners like yourself while ensuring every dollar spent on this critical home improvement investment delivers lasting value over time.
Manchester NH roofing: How Storms and Weathering Impact Your Roof’s Durability
The roof of your home is its first line of defense against external elements. Over time, exposure to storms, changing weather patterns, and natural wear can compromise a roof’s structural integrity. Understanding how these factors impact your roof’s durability is essential for maintaining its longevity and ensuring maximum protection.
Understanding Roof Installation Manchester NH and the Impact of Storm Damage
Storms are one of the leading causes of roof damage.
- High Winds: Strong wind gusts can loosen or completely tear off shingles, exposing underlying layers.
- Hail: Hailstones can cause dents, cracks, and punctures in roofing materials.
- Heavy Rainfall: Prolonged rain exposure may lead to water pooling or leaks that weaken the roof structure over time.
- Debris Impact: Flying debris such as tree branches or loose objects during a storm can puncture or crack roofing materials.
Immediate Steps After a Storm
- Conduct a visual inspection for missing shingles or noticeable damage.
- Clear debris from gutters and downspouts to prevent water accumulation.
- Document any visible issues for insurance purposes.
Understanding How Roof Replacements Manchester NH Are Impacted by Weathering
Weathering refers to the gradual degradation caused by long-term exposure to environmental elements like sunlight, moisture, and temperature changes.
| Roofing Material | Common Signs of Weathering | Longevity with Proper Care |
| Asphalt Shingles | Curling edges, granule loss | 20–30 years |
| Metal Roofing | Rust spots, faded coatings | 40–70 years |
| Wooden Shakes | Splitting, discoloration | 20–40 years |
| Slate Tiles | Cracking edges | 50+ years |
Key Factors Accelerating Weathering
- Sun Exposure (UV Rays): Constant ultraviolet radiation causes fading and brittleness in most materials over time.
- Moisture & Humidity: Persistent dampness encourages mold growth and weakens wooden structures.
- Temperature Fluctuations: Rapid heating and cooling cycles may lead to cracking in certain materials like slate.
Preventative Measures for Roof Durability
To protect your roof from premature wear caused by storms and weathering: – Schedule regular inspections (at least twice per year or after significant weather events). – Apply protective coatings (e. g. , sealants) suitable for your specific roofing material. – Trim overhanging branches near your home to minimize debris impact during storms. – Ensure proper attic ventilation to reduce moisture buildup underneath the roofing structure.
By staying proactive with maintenance and understanding how environmental factors affect durability, homeowners can extend their roof’s lifespan while avoiding costly repairs down the road.
How Storms and Weathering Affect Your Roof: Insights from a Roofing Contractor Manchester NH
Your roof serves as the first line of defense against harsh weather conditions. Over time, exposure to the elements can take a significant toll on its structural integrity and appearance. Understanding how storms and weathering impact your roof’s durability is crucial for maintaining its performance and extending its lifespan.
The Effect of Storms on Roofing Materials
Storms can cause several types of damage to your roof.
- Wind Damage: High winds can lift shingles or tiles, leaving areas of your roof vulnerable to water intrusion.
- Hail Damage: Hailstones can crack or puncture shingles, particularly asphalt roofing, creating weak spots that reduce durability.
- Debris Impact: Falling branches or flying debris during storms may dent metal roofs or break tiles, further compromising your roof.
- Water Penetration: Heavy rain combined with pre-existing damage may lead to leaks that could affect your home’s interior.
Weathering Over Time
Even without extreme storms, everyday weather exposure gradually wears down your roof.
- UV Radiation from Sunlight
Constant exposure to UV rays causes roofing materials like asphalt shingles to dry out and become brittle. Over time, this can lead to cracking and granular loss. - Temperature Fluctuations
Cycles of heating during the day and cooling at night cause expansion and contraction in roofing materials. This thermal movement can lead to warping or splitting over time. - Moisture Accumulation
Persistent humidity or standing water after rain contributes to mold growth, rot in wooden components, and corrosion in metal roofing. - Snow & Ice Load
In cold climates, snow accumulation adds extra weight while ice dams at eaves can block water drainage paths, increasing the risk of leaks.
Table: Common Weather Effects by Roofing Material
| Roofing Material | Susceptibility to Damage | Typical Weather Impacts |
| Asphalt Shingles | Moderate | Granular loss from hail; UV brittleness |
| Metal Roofing | Low | Dents from debris; corrosion |
| Clay Tiles | High | Cracking due to hail; breakage by impact |
| Wood Shakes | High | Rot from moisture; warping from temperature |
| Slate Roofing | Low | Minimal damage; possible cracking under heavy impact |
Tips for Protecting Your Roof Against Weathering
- Conduct regular inspections for signs of damage such as missing shingles or rusted flashing.
- Keep gutters clear of debris to prevent water pooling near critical areas like eaves.
- Trim overhanging tree branches that might fall during storms.
- Invest in high-quality underlayment for added waterproof protection beneath surface materials.
- Consider applying protective coatings (e. g. , reflective paint) on metal roofs for added UV resistance.
By taking proactive measures against weather-related challenges, you can help preserve your investment while ensuring that your home remains safe from external elements for years ahead.
Identifying Roof Damage: Signs You Should Never Ignore
Your roof is one of the most critical components of your home, protecting it from weather elements and maintaining structural integrity. Being aware of these signs helps you act promptly and avoid further issues. Here’s what you should know about identifying roof damage.
Common Signs of Roof Damage
- Shingles that are missing, cracked, or curled are clear indicators of roof wear and tear. This is often caused by aging, harsh weather conditions, or poor installation practices.
- Missing shingles expose the underlayment, making your home vulnerable to leaks and water damage.
- Water stains on ceilings or walls often signal a leak in your roof’s structure.
- Check for dampness in your attic after heavy rain to identify potential trouble spots early.
- A sagging area on your roof may suggest structural damage caused by water pooling over time.
- This issue demands immediate attention as it could compromise the overall safety and stability of your home.
- If you notice excessive granules from asphalt shingles accumulating in your gutters, this indicates shingle deterioration.
- Granules protect shingles from harmful UV rays; losing them reduces their effectiveness.
- Moss and mold thrive in damp environments, which could mean moisture is trapped on your roof surface.
- Beyond aesthetics, this can deteriorate roofing materials over time if left untreated.
- Damaged roofs often lead to poor insulation performance.
- If you’ve noticed an unexpected spike in energy bills due to heating or cooling inefficiencies, it could trace back to issues with your roofing system.
Inspection Tips for Homeowners
- Visual Checks from Ground Level: Use binoculars to inspect for visible signs like missing shingles or rusted flashing without climbing up yourself.
- Inspect After Storms: Strong winds and hailstorms can cause significant damage; always check your roof afterward for debris buildup or torn materials.
- Regular Maintenance: Clean gutters regularly to prevent blockage that might lead to water pooling near vulnerable roof sections.
| Issue | Possible Cause | Recommended Action |
| Missing Shingles | Wind damage | Replace damaged shingles |
| Leaks | Cracks/holes | Seal leaks; call a professional |
| Granule Loss | Aging shingles | Inspect shingle condition |
When It’s Time to Call a Professional
- Fluctuating indoor temperatures despite insulation efforts may indicate compromised roofing layers.
- Repeated leaks that persist even after patchwork repairs suggest deeper systemic issues requiring professional evaluation.
- Visible structural sagging calls for urgent attention as it poses safety risks.
Taking timely action when spotting these warning signs will help protect both the long-term integrity of your roofing system and the safety of your home’s interior spaces from potential damage risks that escalate over time if neglected.
Deciding Between Roof Repairs or Full Roof Replacement: A Homeowner’s Guide
Deciding whether to repair or replace your roof is one of the most significant decisions a homeowner can face. Several factors, including the age of the roof, extent of damage, and type of roofing material, come into play. Here’s a detailed guide to help you make an informed choice.
Factors to Consider
- Asphalt shingles typically last 20–30 years.
- Wood shakes average around 20–25 years but may deteriorate faster in humid climates.
- Localized Damage:Missing shingles or minor leaks can often be repaired easily without replacing the entire roof.
- Widespread Issues:Damage across large sections, such as sagging areas or multiple leaks, signals structural problems that may require replacement.
- Storm-Related Damage:Severe storms can cause underlying issues like weakened decking or flashing damage that might necessitate more extensive work.
- Budget Considerations
Repairs are usually less expensive upfront, but patching over recurring problems could lead to higher long-term costs compared to investing in a full replacement. - Energy Efficiency Goals
Upgrading an older roof with modern materials during a replacement might reduce energy costs through better insulation and reflective properties.
When Is Roof Repair Enough?
Roof repair is typically best for:
– Minor leaks caused by damaged flashing or sealants around vents and chimneys. – Isolated areas with cracked, curled, or missing shingles. – Small areas impacted by pests like birds or insects.
Repairs are also ideal if:
– The overall structure remains solid. – The issue involves cosmetic damage rather than functional deterioration.
When Should You Opt for Full Replacement?
A complete roof replacement becomes necessary when:
– The structural integrity of the roof deck has been compromised (e. g. , sagging).
– Your roofing material has surpassed its expected lifespan and shows significant wear. – Recurring repairs are no longer addressing underlying issues effectively. – There’s evidence of mold growth in attic spaces due to prolonged water intrusion.
Additionally, if you’re planning to sell your home soon, replacing an old roof can boost market appeal and resale value significantly compared to patchwork fixes.
Cost Comparison Table
| Type of Roofing Material | Average Repair Cost (per sq ft) | Average Replacement Cost (per sq ft) |
| Asphalt Shingles | $5–$15 | $3–$7 |
| Metal Roofing | $7–$20 | $8–$15 |
| Tile Roofing | $10–$25 | $12–$25 |
| Wood Shakes | $8–$18 | $10–$20 |
Note: Costs vary based on location and contractor pricing.
Tips for Making the Right Choice
- Conduct regular inspections yourself or hire a roofer at least once per year to assess damage early.
- Obtain multiple quotes from reputable contractors before committing to repair or replacement work.
- Consider partial replacements if only one section (e. g. , north-facing slope) has extensive damage while other areas remain intact.
- Factor in warranties; newer roofs often include long-term manufacturer guarantees that cover defects.
Deciding between repairs and replacements requires careful evaluation of your specific situation, but addressing roofing concerns proactively ensures a safer home environment while saving money over time.
Understanding the Average Roof Replacement Cost by Material (Asphalt, Metal, and More)
One of the most significant considerations homeowners face when planning a roof replacement is cost. The type of material you choose for your roof plays a central role in determining both the upfront expense and long-term value. Understanding these costs can help you make an informed decision that fits your budget while meeting your home’s durability and aesthetic needs.
Factors Affecting Roof Replacement Costs
- Roof Size: Larger roofs require more materials and labor.
- Material Type: Asphalt shingles are typically more affordable, while metal, tile, or slate can be significantly higher in price.
- Labor Costs: Installation complexity varies by material type and roof structure.
- Removal of Old Materials: Tearing off old roofing materials adds additional labor costs.
- Permits and Inspections: Some municipalities require permits for roof replacements, which can increase the overall cost.
Below is an overview of average costs based on roofing materials.
Cost Breakdown by Roofing Material
| Material Type | Average Cost per Square Foot | Lifespan | Key Features |
| Asphalt Shingles | $3 – $6 | 20 to 30 years | Affordable, widely available, simple installation |
| Metal Roofing | $5 – $14 | 40 to 70 years | Durable, eco-friendly, energy-efficient |
| Clay or Concrete Tile | $10 – $25 | 50 years or more | Heavyweight, fire-resistant, excellent for warmer climates |
| Slate Roofing | $15 – $30 | 75 to 100+ years | High-end aesthetic, extremely durable |
| Wood Shingles/Shakes | $6 – $10 | 25 to 30 years | Natural look but requires regular maintenance |
Note: Prices vary depending on region and market fluctuations. Always consult with local contractors for precise estimates.
Asphalt Shingles
Asphalt shingles are one of the most popular choices due to their affordability and ease of installation. They come in various styles and colors to complement different architectural designs. While they may not last as long as premium materials like metal or slate roofing, they offer an excellent balance between cost and durability for budget-conscious homeowners.
Metal Roofing
Metal roofs have gained popularity in recent years because they are lightweight yet incredibly durable. They are highly resistant to weathering and provide superior energy efficiency by reflecting sunlight instead of absorbing it. Although metal roofing requires a higher upfront investment compared to asphalt shingles, its longevity often offsets the initial cost over time.
Clay or Concrete Tiles
Known for their aesthetic appeal in Mediterranean or Spanish-style homes, clay or concrete tiles are an excellent option for hotter climates where heat resistance is essential. However, these materials are heavier than alternatives like asphalt or metal roofing; thus, ensuring your home’s structure can support their weight is critical.
Slate Roofing
For those seeking unmatched elegance coupled with durability that spans decades (or even centuries), slate roofing is an ideal choice. Its high price point makes it less common among average homeowners but remains a favored option for luxury properties.
Tips for Budgeting Your Roof Replacement
When replacing your roof: – Gather multiple estimates from reliable contractors before making a decision. – Investigate financing options if necessary—many companies offer payment plans tailored to homeowners. – Consider long-term savings; while premium materials may be pricier upfront, their extended lifespan often translates into better value over time.
By understanding how different material options impact overall costs and performance factors such as durability and longevity, you’ll be better equipped to make sound decisions regarding your roof replacement project.
Choosing a Roofing Contractor You Can Trust to Deliver Quality and Reliability
Selecting the right roofing contractor is one of the most critical decisions a homeowner can make when embarking on a roofing project. The quality of workmanship and materials used directly impacts your roof’s longevity, performance, and overall value. We were very happy with Manchesterroofing.net in the past. Here’s how you can identify and choose a trustworthy and reliable roofing contractor.
Key Qualities to Look for in a Roofing Contractor
- Licensing and Insurance
Reputable roofing contractors should be fully licensed within your state or region and carry appropriate insurance, including worker’s compensation and general liability coverage. This protects homeowners from potential liabilities during the project. - Experience
Ensure the contractor has substantial experience in installing or repairing roofs similar to yours. Contractors with years of experience are more likely to deliver quality work and anticipate challenges that may arise. - Local Presence
Opt for contractors with an established local presence. Local businesses are often more familiar with regional climate conditions, building codes, and regulations. - References and Reviews
Ask for references from past clients or check online reviews. Reliable contractors will have testimonials that attest to their professionalism, punctuality, communication skills, and craftsmanship.
Questions to Ask Before Hiring
- Look for warranties covering both materials (from manufacturers) and workmanship (from the contractor).
- Reliable contractors should provide an itemized estimate outlining labor costs, material expenses, timelines, and other project details.
- Roofing projects often reveal hidden damage or other complications. Confirm how they plan to address these without deviating significantly from your budget.
- Speaking directly with former clients can give you valuable insight into their experiences.
Red Flags When Hiring
- Lack of licensing or insurance documentation
- High-pressure sales tactics urging immediate decisions
- Unusually low estimates compared to industry standards (may indicate subpar materials or workmanship)
- Refusal to put agreements in writing
| Potential Red Flags | Why It Matters |
| No proof of licensing/insurance | Puts homeowner at legal/financial risk |
| Unclear pricing | Leads to unexpected costs during the project |
| No local office/contact details | Harder to follow up if issues arise |
Benefits of Choosing the Right Contractor
- Peace of mind knowing the job will meet safety standards
- Higher likelihood of proper installation using premium techniques
- Fewer repairs over time due to superior craftsmanship
By taking the time to thoroughly evaluate potential roofing contractors against these criteria, homeowners can safeguard their investment while ensuring that their roof not only looks great but also performs reliably for years ahead.
Avoiding Common Mistakes in Roofing Projects That Lead to Higher Costs
Roofing projects, whether they involve repairs or full replacements, can be significant investments for homeowners. Avoiding common mistakes during these projects is essential to ensure cost-effectiveness and long-term durability. Below, we explore the most frequent errors homeowners make during roofing projects and how to steer clear of them.
Failing to Conduct Proper Research on Roofing Contractors
One of the largest mistakes homeowners make is hiring a contractor without sufficient research. Choosing the wrong contractor can lead to subpar work, delays, and higher costs down the line.
Tips for Choosing the Right Contractor:
– Verify Licensing and Insurance:Always confirm that your contractor holds valid licensing and adequate insurance coverage. This protects you from liability in case of accidents or damage during the project.Check References and Reviews:Look for contractors with strong references and positive customer reviews.Request Detailed Estimates:Obtain comprehensive written estimates from at least three contractors to compare pricing, materials, and timelines.Ask About Warranties:Confirm that both labor and material warranties are included in the contract.
Using Low-Quality Materials
Opting for cheaper, low-quality roofing materials may save money initially but often results in higher costs over time due to reduced durability and frequent repairs.
Considerations When Selecting Roofing Materials:
| Material Type | Average Lifespan | Benefits | Drawbacks |
|—————–|——————|———————————–|————————————|
| Asphalt Shingles | 15–30 years | Affordable, widely available | Shorter lifespan compared to others |
| Metal | 40–70 years | Durable, energy-efficient | Higher upfront cost |
| Slate | 50–100 years | Long-lasting, aesthetically pleasing| Heavy; requires reinforced framing |
Choose materials based on your local climate conditions (e. g. , high winds or heavy snow) and budget while prioritizing longevity.
Overlooking Regular Maintenance After Installation
Neglecting routine maintenance can significantly shorten your roof’s lifespan. Many homeowners believe that once a roof is installed, it no longer requires attention until visible issues arise.
Essential Maintenance Practices:
– Inspect your roof twice a year (spring and fall) for signs of damage or wear. – Keep gutters clear of debris to prevent water pooling around your roofline. – Trim overhanging tree branches near your home to reduce potential damage from falling limbs.
Ignoring Permits and Local Building Codes
Skipping permit applications or failing to follow local regulations may result in fines or forced removal of non-compliant work. This mistake adds unnecessary expenses to roofing projects.
Steps to Stay Code-Compliant:
1. Consult with your contractor about required permits before any work begins. 2. Research local building codes related to roofing materials, ventilation systems, or slope requirements. 3. Ensure inspections are conducted throughout the process as needed by your municipality.
Mismanaging Project Timelines During Peak Seasons
Scheduling roofing projects during peak times (such as summer) often leads to rushed work due to high demand or increased labor costs from contractors trying to meet tight deadlines.
How To Avoid Timing Issues:
– Schedule projects during off-peak seasons like late fall or early spring for better availability of contractors. – Account for potential weather-related delays when planning longer projects. – Communicate clearly with your contractor about realistic timelines.
Avoiding these common roofing mistakes requires careful planning, attention to detail, and collaboration with qualified professionals. By taking proactive measures at every stage of your project—from choosing a trustworthy contractor to selecting durable materials—you can ensure a successful outcome while minimizing unnecessary expenses.
- Comprehensive Guide to Roof Replacement by a Top Roofer Manchester NH
- Tips for Identifying and Fixing Roof Leaks with Manchester NH Roofing Experts
- Everything You Need to Know About Roof Replacements Manchester NH and Their Benefits
- How to Identify Roof Leaks and When to Call a Roofer Manchester NH
- Comprehensive Guide to Choosing the Best Roofing Contractor Manchester NH for Your Home or Business
- How to Choose the Best Roofer Manchester NH for Your Project
- How to Find a Reliable Roofing Contractor Manchester NH for Leak Repairs
- Identifying Roof Leak Warning Signs with a Trusted Roofing Contractor Manchester NH
- Step-by-Step Guide and Tips for Manchester NH Roofing Repair and Replacement